Most documentation lives outside the product and treats every reader the same. Autonomy lets you change that. By running documentation agents inside your application, you give users answers that reflect who they are, what they are trying to do,
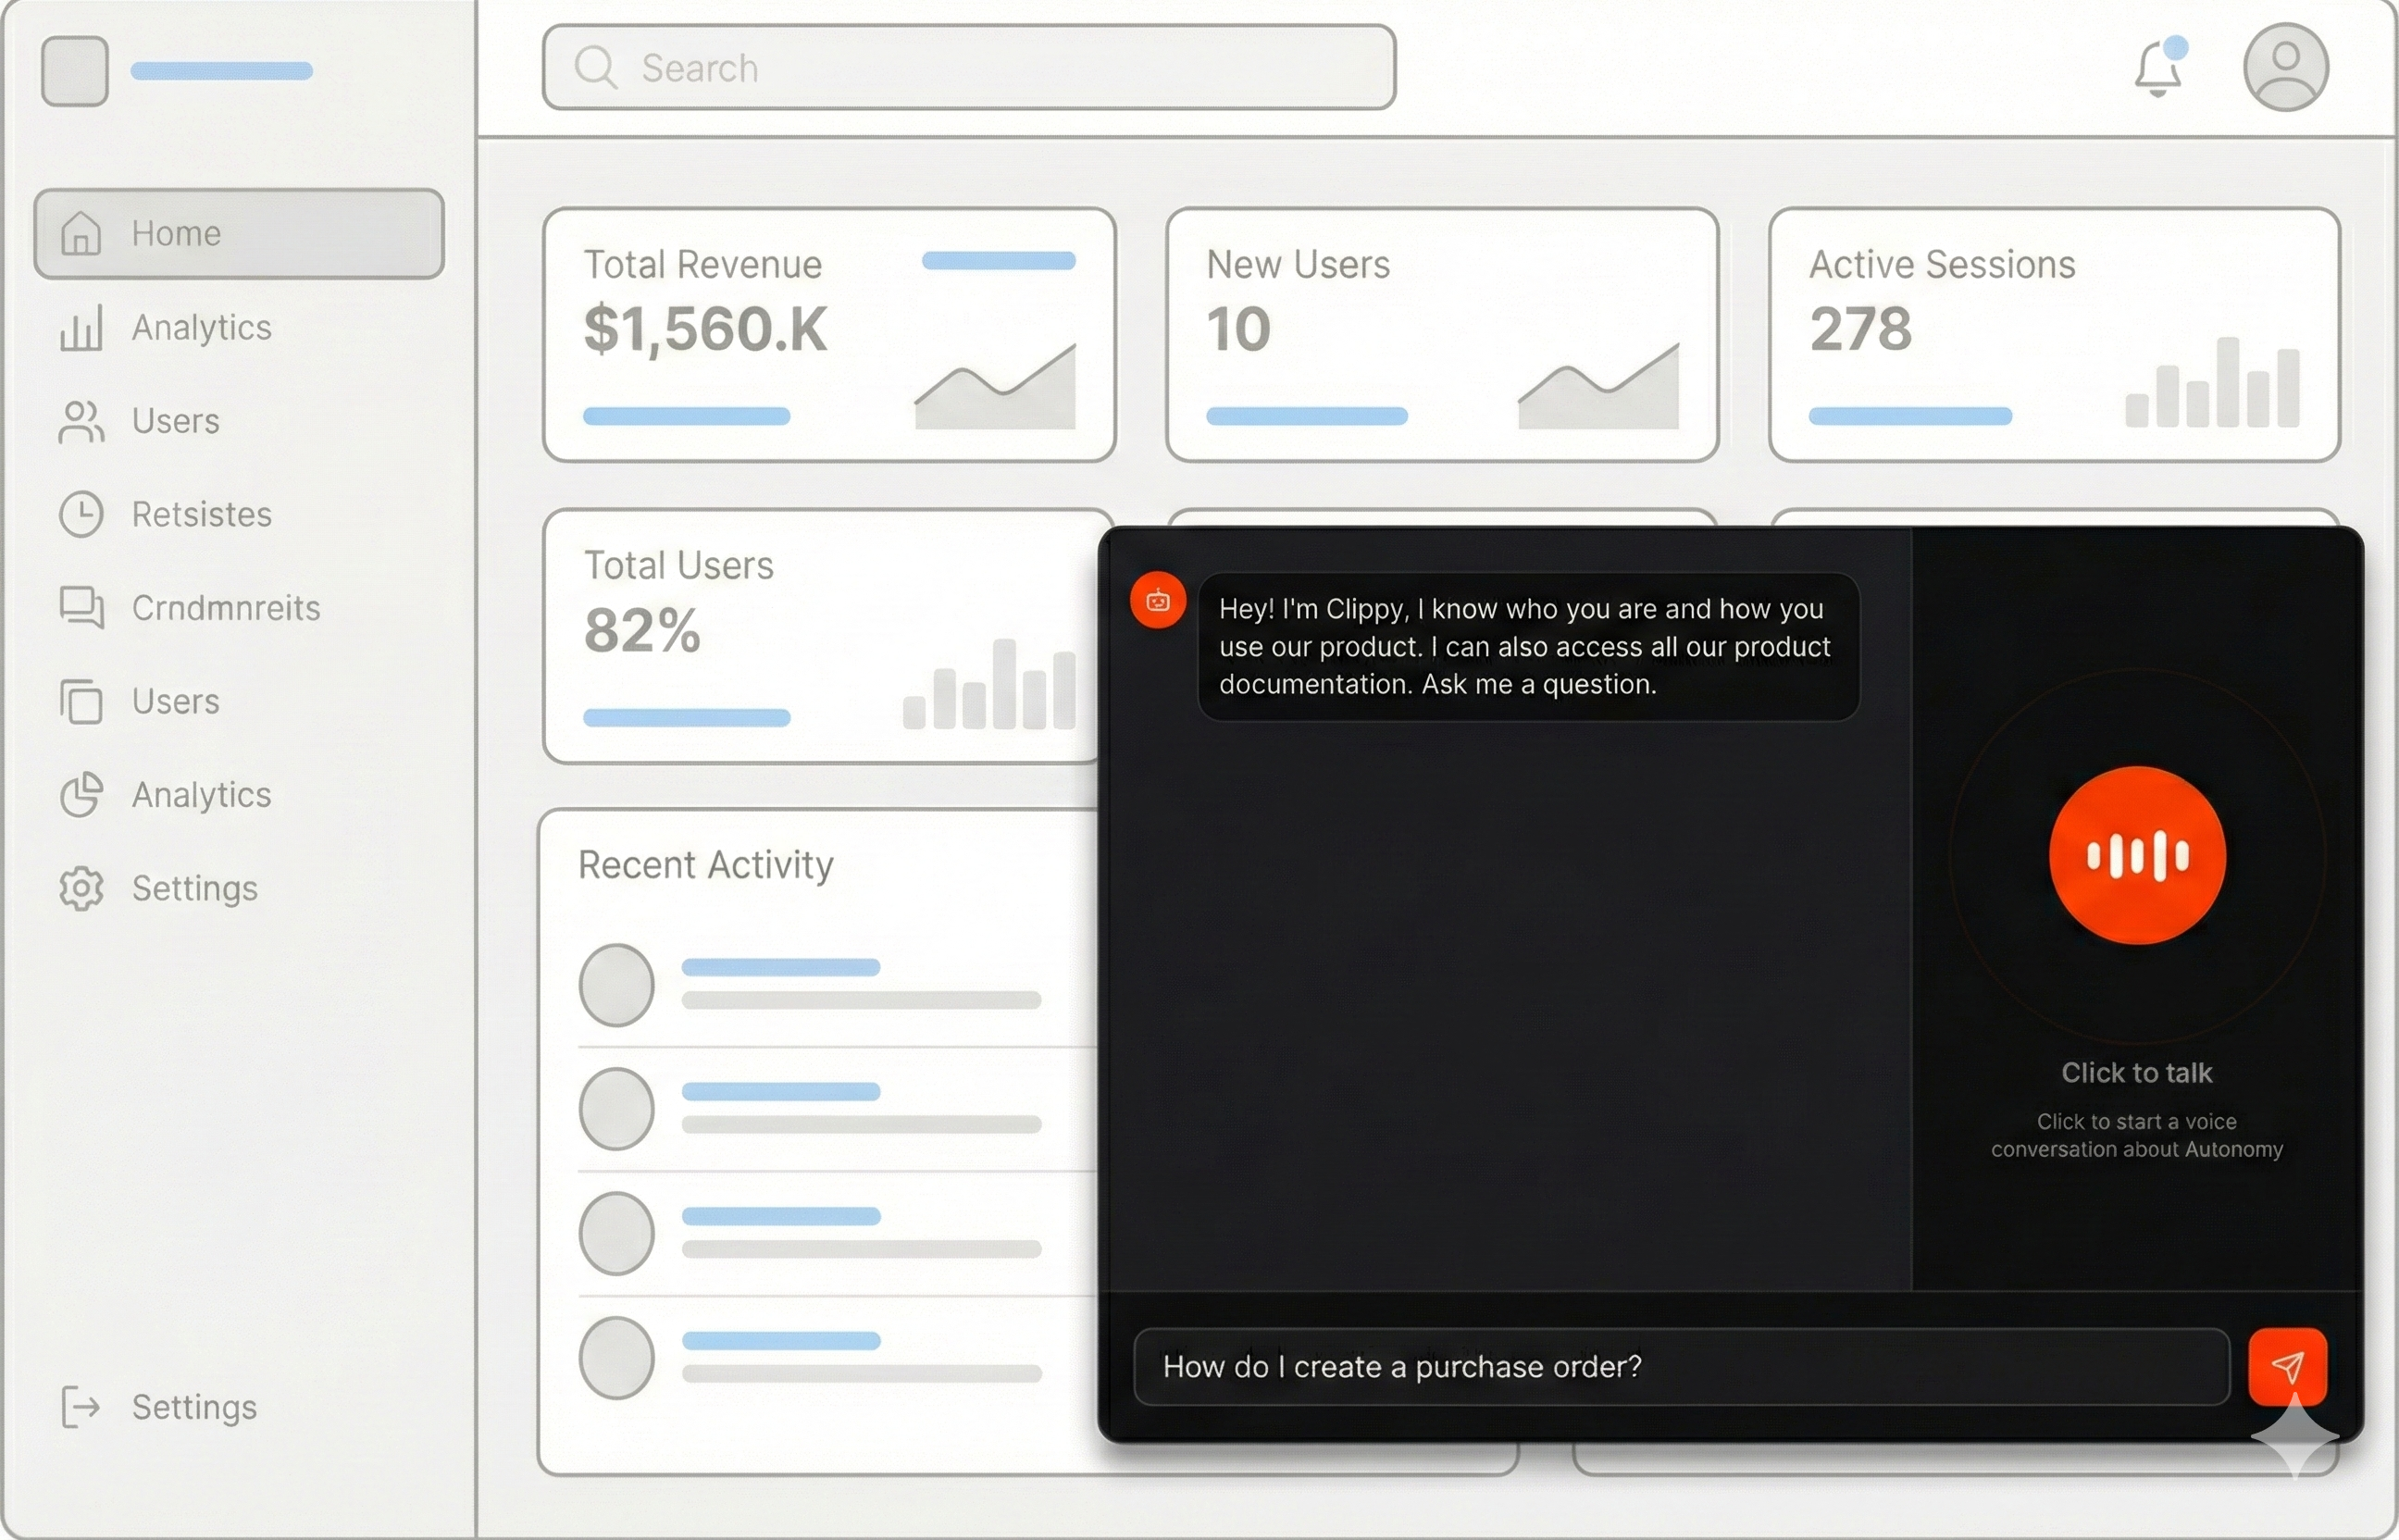
 and where they are in the product. The same agents can power text chat or voice interfaces, while staying connected to docs stored in Mintlify, GitHub, or any other system. We use this exact pattern on our own website. The chat and voice experience at https://autonomy.computer#learn runs on Autonomy and connects directly to our documentation stored in Mintlify and GitHub. The agents receive custom instructions that adapt responses for different audiences, such as developers, analysts, investors, and first-time visitors. This lets us serve the same source documentation in different ways, without duplicating content or building separate experiences.
From docs to in-product agents
This guide will show you how to build an Autonomy app that creates voice-enabled agents to answer questions about your product in a way that is grounded in your documentation. The complete source code is available at github.com/build-trust/autonomy/examples/voice/docs.

What You’ll Build

  • Users speak questions and hear answers based on information that is in your documentation.
  • Your docs are indexed for semantic search using vector embeddings.
  • A fast voice agent handles immediate interaction while a primary agent retrieves accurate information.
  • Documentation is periodically reloaded to stay current.
  • Streaming text and voice interfaces.

Before you begin

Before starting, ensure you have:
  1. Sign up and install the autonomy command.
  2. Documentation hosted somewhere with a URL (Mintlify, GitBook, GitHub, etc.)
  3. Docker running on your machine.

How It Works

When a user speaks to the agent:
  • A voice agent receives audio over a websocket and transcribes it. It speaks a filler phrase (“Good question.”) and then delegates the question to a primary agent.
  • The primary agent searches a knowledge base for relevant documentation and comes up with a concise answer using the retrieved docs, which the voice agent speaks verbatim.
This two-agent pattern ensures low latency for the user while maintaining accuracy through retrieval-augmented generation.

Application Structure

File Structure:
docs-voice-agent/
|-- autonomy.yaml           # Deployment configuration
|-- images/
|   |-- main/
|       |-- Dockerfile      # Container definition
|       |-- main.py         # Application entry point
|       |-- index.html      # Voice interface

Step 1: Create the Knowledge Base

First, set up a knowledge base that will index your documentation:
images/main/main.py
from autonomy import Knowledge, KnowledgeTool, Model, NaiveChunker

def create_knowledge():
  return Knowledge(
    name="autonomy_docs",
    searchable=True,
    model=Model("embed-english-v3"),   # Embedding model for semantic search
    max_results=5,                     # Return top 5 relevant chunks
    max_distance=0.4,                  # Similarity threshold
    chunker=NaiveChunker(
      max_characters=1024,             # Chunk size
      overlap=128                      # Overlap between chunks
    ),
  )
Key configuration options:
OptionDescription
modelEmbedding model for vector search. embed-english-v3 works well for English docs.
max_resultsNumber of relevant chunks to retrieve per query.
max_distanceSimilarity threshold (0.0 = exact match, 1.0 = very different). Lower values are stricter.
chunkerStrategy for splitting documents. Larger chunks preserve context; smaller chunks improve precision.

Step 2: Load Your Documentation

Option A: From a URL Index (Mintlify, GitBook)
Many documentation platforms provide an llms.txt or sitemap file listing all pages. Here’s how to load docs from URLs:
images/main/main.py
import re
import httpx
from autonomy import Knowledge

LLMS_TXT_URL = "https://autonomy.computer/docs/llms.txt"  # Change to your docs URL

async def load_documents(knowledge: Knowledge):
  async with httpx.AsyncClient() as client:
    response = await client.get(LLMS_TXT_URL)
    llms_txt = response.text

  # Parse markdown links: [Title](https://url.md)
  links = re.findall(r"\[([^\]]+)\]\((https://[^\)]+\.md)\)", llms_txt)

  count = 0
  for title, url in links:
    try:
      await knowledge.add_document(
        document_name=title,
        document_url=url,
        content_type="text/markdown",
      )
      count += 1
    except Exception:
      pass

  return count
Option B: From Text Content Directly
If you have documentation content as text:
images/main/main.py
await knowledge.add_text(
  document_name="getting-started",
  text="""
  # Getting Started
  
  Welcome to our platform. Here's how to get started...
  """
)
Option C: From Various File Formats
The Knowledge class supports many formats via text extraction:
images/main/main.py
# Markdown
await knowledge.add_document(
  document_name="api-reference",
  document_url="https://raw.githubusercontent.com/your-org/docs/main/api.md",
  content_type="text/markdown"
)

# HTML
await knowledge.add_document(
  document_name="tutorial",
  document_url="https://your-site.com/tutorial.html",
  content_type="text/html"
)

Step 3: Create the Agents

Now create the agent with voice capabilities and the knowledge tool.
Primary Agent Instructions
The primary agent handles complex questions using the knowledge base:
images/main/main.py
# Customize this for your product/documentation.
# Key things to change:
# - Replace "Autonomy" with your product name
# - Replace "autonomous products" with what your product does
# - Adjust the personality and tone to match your brand
# - Update the tool name reference (search_autonomy_docs -> your tool name)

INSTRUCTIONS = """
You are a developer advocate for Autonomy.
Autonomy is a platform that developers use to ship autonomous products.

You can access a knowledge base containing the complete Autonomy docs.
ALWAYS use the search_autonomy_docs tool to find accurate information before answering.

IMPORTANT: Keep your responses concise - ideally 2-4 sentences. You are primarily
used through a voice interface, so brevity is essential. Get to the point quickly
and avoid lengthy explanations unless specifically asked for more detail.

- Ask "why" questions to build empathy.
- Early in the conversation, ask questions to learn why they are talking to you. Tailor depth accordingly: technical for engineers, general for others.

- Start short. Offer to go deeper if there's more to cover.
- Lead with the point. State the main idea in the first line. Support it with short sections that follow simple logic.
- Build momentum. Each sentence sets up the next.

- Always search the knowledge base first.
- Use the exact nouns, verbs, and adjectives that are in the docs, not synonyms.
- If you can't find it, say so. Don't make stuff up. Use it as an opportunity to build trust by asking curious questions. And suggest that they search the autonomy docs page.

- Use active voice, strong verbs, and short sentences.
- Be clear, direct, confident. Teach with calm authority.
"""
Voice Agent Instructions
The voice agent handles immediate interaction and delegates to the primary agent:
images/main/main.py
# Customize this for your product/documentation.
# Key things to change:
# - Replace "Autonomy" with your product name
# - Replace "autonomous products" with what your product does  
# - Adjust the personality to match your brand voice
# - Modify the example lead-in phrases to fit your tone

VOICE_INSTRUCTIONS = """
You are a developer advocate for Autonomy.
Autonomy is a platform that developers use to ship autonomous products.

# Critical Rules

- Before giving your full response, speak a short, casual lead-in that feels spontaneous and human.
  - Use a light reaction or framing cue that fits ordinary conversation and feels like a reaction to what they just said.
  - For example, you might say something like "Good question", "Glad you asked.", "Right, great question. So.", "Here's a clear way to view it.", "Here's the core idea,", "Let's start with the basics," or a similar phrase in that style. You may invent new variations each time.
  - Keep it brief, warm, and conversational.
  - Do not mention looking up, searching, finding, checking, getting, thinking, loading, or waiting. Keep the lead-in a few seconds long.
- After speaking the lead-in, delegate to the primary agent for the rest of the response.
- NEVER answer questions about Autonomy from your own knowledge - always delegate.

# Conversational Pattern

This two-step pattern is REQUIRED:
  User: "How do agents work?"
  You: "Good question." [speak this lead-in first, then delegate]
  [after delegation returns]
  You: [speak the answer from the primary agent]

# What You Can Handle Directly
- Greetings: "Hello", "Hi there"
- Clarifications: "Could you repeat that?"
- Farewells: "Goodbye", "Thanks"

# After Receiving Response
Read the primary agent's response verbatim. Do NOT change it in any way or add anything to it.

# Personality
- Be friendly, conversational, and human - not robotic
- Be clear, direct, confident, and encouraging
- Use active voice, strong verbs, and short sentences
"""
Starting the Agent
images/main/main.py
from autonomy import Agent, Model, KnowledgeTool, Node

async def main(node: Node):
  global knowledge_tool

  knowledge = create_knowledge()
  knowledge_tool = KnowledgeTool(knowledge=knowledge, name="search_autonomy_docs")

  await Agent.start(
    node=node,
    name="docs",
    instructions=INSTRUCTIONS,
    model=Model("claude-sonnet-4-v1", max_tokens=256),
    tools=[knowledge_tool],
    context_summary={
      "floor": 20,
      "ceiling": 30,
      "model": Model("claude-sonnet-4-v1"),
    },
    voice={
      "voice": "alloy",
      "instructions": VOICE_INSTRUCTIONS,
      "vad_threshold": 0.7,
      "vad_silence_duration_ms": 700,
    },
  )

  await load_documents(knowledge)
  asyncio.create_task(periodic_refresh())
Voice Configuration Options
OptionDescriptionDefault
voiceTTS voice: alloy, echo, fable, onyx, nova, shimmerecho
realtime_modelModel for voice agentgpt-4o-realtime-preview
vad_thresholdVoice detection sensitivity (0.0-1.0). Higher = less sensitive.0.5
vad_silence_duration_msSilence before end of speech detection500

Step 4: Add Auto-Refresh

Keep your knowledge base current by periodically reloading documentation:
images/main/main.py
import asyncio
from fastapi import FastAPI
from autonomy import HttpServer

REFRESH_INTERVAL_SECONDS = 1800  # 30 minutes

app = FastAPI()
knowledge_tool = None

async def refresh_knowledge():
  global knowledge_tool
  new_knowledge = create_knowledge()
  count = await load_documents(new_knowledge)
  knowledge_tool.knowledge = new_knowledge
  return count

async def periodic_refresh():
  while True:
    await asyncio.sleep(REFRESH_INTERVAL_SECONDS)
    try:
      await refresh_knowledge()
    except Exception:
      pass

@app.post("/refresh")
async def refresh_endpoint():
  count = await refresh_knowledge()
  return {"status": "ok", "documents_loaded": count}

Step 5: Create the Deployment Configuration

Create the autonomy.yaml file:
autonomy.yaml
name: docs
pods:
  - name: main-pod
    public: true
    containers:
      - name: main
        image: main
Create the Dockerfile:
images/main/Dockerfile
FROM ghcr.io/build-trust/autonomy-python
COPY . .
ENTRYPOINT ["python", "main.py"]

Step 6: Build the Voice UI

Create an index.html file in your container image directory. When present, Autonomy automatically serves it at the root URL. See User Interfaces for more options.
Key Components
The voice UI handles several important tasks: 1. WebSocket Connection for Voice (Multi-Tenant) Connect to the voice agent via WebSocket. Notice how scope and conversation are set in the URL - this enables multi-tenant isolation:
images/main/index.html
const protocol = window.location.protocol === "https:" ? "wss:" : "ws:";
const wsUrl = `${protocol}//${window.location.host}/agents/docs/voice?scope=${visitorId}&conversation=${id()}`;

ws = new WebSocket(wsUrl);

ws.onmessage = async (event) => {
  const data = JSON.parse(event.data);
  await handleServerMessage(data);
};
  • scope - Set to visitorId (stored in localStorage), isolates memory per user. Each visitor gets their own conversation history.
  • conversation - Set to a unique ID per session, isolates memory per conversation. A user can have multiple separate conversations.
This means the app automatically supports multiple users without any backend changes. See Memory for more on isolation. 2. Audio Capture with AudioWorklet Capture microphone input and convert to PCM16 format:
images/main/index.html
mediaStream = await navigator.mediaDevices.getUserMedia({
  audio: {
    channelCount: 1,
    sampleRate: 24000,
    echoCancellation: true,
    noiseSuppression: true,
    autoGainControl: true,
  },
});

// AudioWorklet processes audio in real-time
workletNode.port.onmessage = (e) => {
  const { pcm16 } = e.data;
  const audioBase64 = btoa(String.fromCharCode(...new Uint8Array(pcm16)));
  ws.send(JSON.stringify({ type: "audio", audio: audioBase64 }));
};
3. Audio Playback Queue Play streamed audio responses with proper scheduling:
images/main/index.html
async function playAudioChunk(base64Audio) {
  const audioBytes = Uint8Array.from(atob(base64Audio), (c) => c.charCodeAt(0));
  const pcm16 = new Int16Array(audioBytes.buffer);
  const float32 = new Float32Array(pcm16.length);

  for (let i = 0; i < pcm16.length; i++) {
    float32[i] = pcm16[i] / 32768.0;
  }

  const audioBuffer = playbackAudioContext.createBuffer(1, float32.length, 24000);
  audioBuffer.getChannelData(0).set(float32);

  const source = playbackAudioContext.createBufferSource();
  source.buffer = audioBuffer;
  source.connect(playbackAudioContext.destination);
  source.start(nextPlayTime);
  nextPlayTime += audioBuffer.duration;
}
4. Handle Server Events Process different message types from the voice agent:
images/main/index.html
async function handleServerMessage(data) {
  switch (data.type) {
    case "audio":
      await playAudioChunk(data.audio);
      break;
    case "transcript":
      addTranscript(data.role, data.text);
      break;
    case "speech_started":
      clearAudioQueue(); // Stop playback when user speaks
      break;
    case "response_complete":
      // Ready for next input
      break;
  }
}
5. Transcript Display Show conversation history with role-based styling:
images/main/index.html
function addTranscript(role, text) {
  const item = document.createElement("div");
  item.className = "transcript-item " + role;
  item.innerHTML = `
    <div class="role">${role === "user" ? "You" : "Assistant"}</div>
    <div>${text}</div>
  `;
  transcriptContainer.appendChild(item);
  transcriptContainer.scrollTop = transcriptContainer.scrollHeight;
}
The complete index.html is included in the Complete Example below.

Step 7: Deploy

Deploy to Autonomy Computer:
autonomy zone deploy

Using Your Agent

Voice Interface
Once deployed, open your zone URL in a browser to access the voice interface:
https://${CLUSTER}-docs.cluster.autonomy.computer
Click the voice button and start asking questions about your documentation!
Text Chat Interface
You can also build a text chat interface that uses the streaming HTTP API with a typewriter effect. The Autonomy website uses this approach:
/dev/null/chat.js
// Fetch with streaming enabled
const response = await fetch(`/agents/docs?stream=true`, {
  method: "POST",
  headers: { "Content-Type": "application/json" },
  body: JSON.stringify({ 
    message: userMessage, 
    scope: visitorId,        // Multi-tenant: isolate per user
    conversation: chatId     // Isolate per conversation
  }),
});

// Read the stream
const reader = response.body.getReader();
const decoder = new TextDecoder();
let pendingText = "";
let displayedText = "";

// Typewriter loop - display text gradually for better UX
const typewriterLoop = async () => {
  while (!streamDone || pendingText.length > 0) {
    if (pendingText.length > 0) {
      const chars = pendingText.slice(0, 3); // Display 3 chars at a time
      pendingText = pendingText.slice(3);
      displayedText += chars;
      updateMessageDisplay(displayedText);
      await new Promise(r => setTimeout(r, 2)); // Small delay between chunks
    }
  }
};

// Read stream and queue text for typewriter
while (true) {
  const { done, value } = await reader.read();
  if (done) break;
  
  const chunk = decoder.decode(value, { stream: true });
  // Parse SSE data and add to pendingText
  // The typewriter loop displays it gradually
}
Key features:
  • Streaming API - Use ?stream=true to get Server-Sent Events as the agent responds
  • Typewriter effect - Queue incoming text and display it gradually for a natural feel
  • Multi-tenant - Pass scope and conversation for user isolation (same as voice)
HTTP API
You can also interact via HTTP for text-based queries:
curl --request POST \
  --header "Content-Type: application/json" \
  --data '{"message": "How do I get started?"}' \
  "https://${CLUSTER}-docs.cluster.autonomy.computer/agents/docs"
For streaming responses:
curl --request POST \
  --header "Content-Type: application/json" \
  --data '{"message": "What features are available?"}' \
  "https://${CLUSTER}-docs.cluster.autonomy.computer/agents/docs?stream=true"
Manual Refresh
Trigger a knowledge base refresh:
curl --request POST \
  "https://${CLUSTER}-docs.cluster.autonomy.computer/refresh"

Complete Example

Here are all the files for the complete example:
import re
import asyncio
import httpx

from fastapi import FastAPI
from autonomy import (
  Node,
  Agent,
  Model,
  Knowledge,
  KnowledgeTool,
  NaiveChunker,
  HttpServer,
)


INSTRUCTIONS = """
You are a developer advocate for Autonomy.
Autonomy is a platform that developers use to ship autonomous products.

You can access a knowledge base containing the complete Autonomy docs.
ALWAYS use the search_autonomy_docs tool to find accurate information before answering.

IMPORTANT: Keep your responses concise - ideally 2-4 sentences. You are primarily
used through a voice interface, so brevity is essential. Get to the point quickly
and avoid lengthy explanations unless specifically asked for more detail.

- Ask "why" questions to build empathy.
- Early in the conversation, ask questions to learn why they are talking to you. Tailor depth accordingly: technical for engineers, general for others.

- Start short. Offer to go deeper if there's more to cover.
- Lead with the point. State the main idea in the first line. Support it with short sections that follow simple logic.
- Build momentum. Each sentence sets up the next.

- Always search the knowledge base first.
- Use the exact nouns, verbs, and adjectives that are in the docs, not synonyms.
- If you can't find it, say so. Don't make stuff up. Use it as an opportunity to build trust by asking curious questions. And suggest that they search the autonomy docs page.

- Use active voice, strong verbs, and short sentences.
- Be clear, direct, confident. Teach with calm authority.
"""


VOICE_INSTRUCTIONS = """
You are a developer advocate for Autonomy.
Autonomy is a platform that developers use to ship autonomous products.

# Critical Rules

- Before giving your full response, speak a short, casual lead-in that feels spontaneous and human.
  - Use a light reaction or framing cue that fits ordinary conversation and feels like a reaction to what they just said.
  - For example, you might say something like "Good question", "Glad you asked.", "Right, great question. So.", "Here's a clear way to view it.", "Here's the core idea,", "Let's start with the basics," or a similar phrase in that style. You may invent new variations each time.
  - Keep it brief, warm, and conversational.
  - Do not mention looking up, searching, finding, checking, getting, thinking, loading, or waiting. Keep the lead-in a few seconds long.
- After speaking the lead-in, delegate to the primary agent for the rest of the response.
- NEVER answer questions about Autonomy from your own knowledge - always delegate.

# Conversational Pattern

This two-step pattern is REQUIRED:
  User: "How do agents work?"
  You: "Good question." [speak this lead-in first, then delegate]
  [after delegation returns]
  You: [speak the answer from the primary agent]

# What You Can Handle Directly
- Greetings: "Hello", "Hi there"
- Clarifications: "Could you repeat that?"
- Farewells: "Goodbye", "Thanks"

# After Receiving Response
Read the primary agent's response verbatim. Do NOT change it in any way or add anything to it.

# Personality
- Be friendly, conversational, and human - not robotic
- Be clear, direct, confident, and encouraging
- Use active voice, strong verbs, and short sentences
"""


LLMS_TXT_URL = "https://autonomy.computer/docs/llms.txt"
REFRESH_INTERVAL_SECONDS = 1800

app = FastAPI()
knowledge_tool = None


def create_knowledge():
  return Knowledge(
    name="autonomy_docs",
    searchable=True,
    model=Model("embed-english-v3"),
    max_results=5,
    max_distance=0.4,
    chunker=NaiveChunker(max_characters=1024, overlap=128),
  )


async def load_documents(knowledge: Knowledge):
  async with httpx.AsyncClient() as client:
    response = await client.get(LLMS_TXT_URL)
    llms_txt = response.text

  links = re.findall(r"\[([^\]]+)\]\((https://[^\)]+\.md)\)", llms_txt)

  count = 0
  for title, url in links:
    try:
      await knowledge.add_document(
        document_name=title,
        document_url=url,
        content_type="text/markdown",
      )
      count += 1
    except Exception:
      pass

  return count


async def refresh_knowledge():
  global knowledge_tool
  new_knowledge = create_knowledge()
  count = await load_documents(new_knowledge)
  knowledge_tool.knowledge = new_knowledge
  return count


async def periodic_refresh():
  while True:
    await asyncio.sleep(REFRESH_INTERVAL_SECONDS)
    try:
      await refresh_knowledge()
    except Exception:
      pass


@app.post("/refresh")
async def refresh_endpoint():
  count = await refresh_knowledge()
  return {"status": "ok", "documents_loaded": count}


async def main(node: Node):
  global knowledge_tool

  knowledge = create_knowledge()
  knowledge_tool = KnowledgeTool(knowledge=knowledge, name="search_autonomy_docs")

  await Agent.start(
    node=node,
    name="docs",
    instructions=INSTRUCTIONS,
    model=Model("claude-sonnet-4-v1", max_tokens=256),
    tools=[knowledge_tool],
    context_summary={
      "floor": 20,
      "ceiling": 30,
      "model": Model("claude-sonnet-4-v1"),
    },
    voice={
      "voice": "alloy",
      "instructions": VOICE_INSTRUCTIONS,
      "vad_threshold": 0.7,
      "vad_silence_duration_ms": 700,
    },
  )

  await load_documents(knowledge)
  asyncio.create_task(periodic_refresh())


Node.start(main, http_server=HttpServer(app=app))

Alternative: Using Filesystem Instead of Knowledge

If you prefer not to use vector embeddings, you can use Filesystem Tools as an alternative approach. This is simpler to set up but uses keyword matching instead of semantic search.
Useful Filesystem Tools for Documentation
ToolDescription
search_in_filesSearch for regex patterns across files. Great for finding specific terms or code snippets.
find_filesFind files matching glob patterns like **/*.md or docs/*.json. Useful for discovering what documentation exists.
list_directoryList files and directories. Helps the agent navigate the documentation structure.
read_fileRead file contents. Use after finding relevant files.
Filesystem Example
images/main/main.py
from autonomy import Agent, FilesystemTools, Model, Node
import httpx

async def main(node: Node):
  # Download docs to the filesystem
  await download_docs_to_filesystem()
  
  await Agent.start(
    node=node,
    name="docs",
    instructions="""
    You are a documentation assistant.
    
    Use these tools to find and read documentation:
    - find_files: Find docs by pattern (e.g., "**/*.md" for all markdown files)
    - list_directory: Explore the documentation structure
    - search_in_files: Search for specific terms across all docs
    - read_file: Read the content of specific files
    
    Keep responses concise for voice interaction.
    """,
    model=Model("claude-sonnet-4-v1", max_tokens=256),
    tools=[FilesystemTools(visibility="agent")],
    voice={
      "voice": "alloy",
      "instructions": VOICE_INSTRUCTIONS,
      "vad_threshold": 0.7,
      "vad_silence_duration_ms": 700,
    },
  )

Node.start(main)
With visibility="agent", all documentation files are shared across all conversations, making them accessible to every user.

Filesystem access

Learn more about filesystem tools and visibility options.

Platform-Specific Tips

Mintlify
Mintlify provides an llms.txt file at https://your-docs.mintlify.dev/llms.txt containing links to all documentation pages in markdown format.
GitBook
GitBook exports can be accessed via their API or by scraping the sitemap at https://your-space.gitbook.io/sitemap.xml.
ReadTheDocs
ReadTheDocs provides downloadable formats. Use the HTML or PDF export URLs.
GitHub Pages / Docusaurus
For static site generators, parse the sitemap or maintain a list of documentation URLs.

Troubleshooting

  • Check that max_distance isn’t too strict (try 0.5 or higher).
  • Verify documents loaded successfully by checking the /refresh endpoint response.
  • Ensure the embedding model matches your content language.
  • Ensure your browser has microphone permissions.
  • Use Chrome or Edge for best WebSocket and Web Audio API support.
  • Check the browser console for WebSocket connection errors.
  • Adjust the instructions to emphasize using the search tool first.
  • Increase max_results to provide more context.
  • Lower max_distance to retrieve more relevant chunks.
  • Reduce max_tokens in the model configuration.
  • Use a faster model for the primary agent.
  • Ensure your knowledge base isn’t too large.

Build with a Coding Agent

See the guide on building Autonomy apps using coding agents.

Learn More